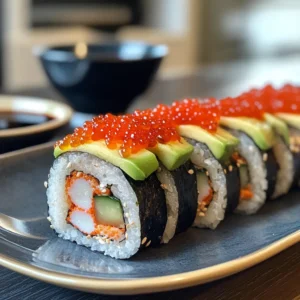
Boston Roll
A Boston roll features tender cooked shrimp, fresh cucumber, and creamy avocado rolled in seasoned sushi rice and nori. It’s finished with vibrant tobiko or masago for a pop of color and flavor, making it a simple yet delicious introduction to homemade sushi.
Ingredients
For the Sushi Rice
- 2 cups sushi rice
- 4 tablespoons rice vinegar
- 2 tablespoons sugar
- 1 teaspoon salt
For the Boston Roll
- 12 large shrimps (steamed or poached, halved lengthwise)
- 2 sheets of nori (roasted seaweed)
- 1 avocado, peeled, pitted, and sliced into thin strips
- ½ cup tobiko (flying fish roe) or masago (capelin roe)
Instructions
Prepare the Sushi Rice
- Sushi rice is the heart of any roll, so give it plenty of love and attention.
- Rinse the sushi rice under cold water until the water runs clear. This removes excess starch.
- Cook the rice according to the package instructions or using a rice cooker.
- Mix the cooked rice with rice vinegar, sugar, and salt while it’s still hot.
- Cool the rice to room temperature by spreading it out on a tray or in a large bowl. Let it rest until you can handle it comfortably.
Prep the Fillings
- I like to keep my workstation neat, so I gather everything in small bowls.
- Poach or Steam Shrimp: Bring a pot of lightly seasoned water to a gentle simmer. Add peeled and deveined shrimp, cooking for about 2–3 minutes. They should turn pink and opaque.
- Slice Shrimp in half lengthwise if they’re on the larger side.
- Slice Avocado into thin strips (add a tiny squeeze of lemon juice to prevent browning).
- Cut Cucumber into sticks that match the length of a nori sheet’s width.
Set Up Your Rolling Station
- If you’ve never rolled sushi before, don’t worry—this part is surprisingly fun.
- Lay a Bamboo Mat on a clean surface. You can find these mats in most grocery stores or online.
- Top with Plastic Wrap to prevent the rice from sticking to the mat.
- Place a Nori Sheet on top of the plastic wrap, shiny side down.
Spread the Sushi Rice
- Now it’s time to get our hands (slightly) sticky.
- Moisten Your Hands with water to minimize rice sticking.
- Take a Handful of Sushi Rice and spread it gently over the nori sheet. Try not to compress the rice too firmly; a light touch makes for a fluffier roll.
- Flip the rice-covered nori so that the rice is now facing the plastic wrap.
Add the Fillings
- Don’t go overboard; a little goes a long way.
- Arrange Shrimp (cut side up) in a neat row down the center of the nori (on the side now facing up).
- Top with Avocado slices.
- Add Cucumber sticks.
- Sprinkle a pinch of tobiko or masago if you like bursts of ocean flavor and a pop of color.
Roll It Up
- Here’s where you’ll channel your inner sushi chef.
- Lift the Bamboo Mat from the edge closest to you.
- Roll gently away from your body, holding the fillings in place.
- Tighten slightly as you roll, applying even pressure to create a firm cylinder without squishing the ingredients.
Cut into Bite-Sized Pieces
- This is the moment you’ve been waiting for—revealing your artistic sushi creations.
- Wet a Sharp Knife to prevent sticking.
- Slice the roll into 6–8 pieces.
- Wipe the Knife with a damp cloth between cuts for cleaner edges.
Serve and Garnish
- Arrange your Boston roll pieces on a platter or sushi plate. Sprinkle extra tobiko or masago over the top if desired. Present them with soy sauce, wasabi, and pickled ginger on the side for a complete sushi experience.